Cloudways is the world’s best cloud hosting provider. It allows you to choose from different cloud platforms, such as Google Cloud Platform, Amazon, Vult, Linode, and DigitalOcean.
However, the downside of Cloudways is they don’t offer domain registration services. So, you need to purchase a domain name from other web hosting providers.
After purchasing the domain name from a reputed web hosting provider, you need to point it to Cloudways. This process sounds a bit tricky, but trust me, a newborn baby can also do this by completing this tutorial.
In this tutorial, I’ll show you how to point your domain to Cloudways and provide examples of reputed web hosting companies such as Namecheap, Hostinger, and Cloudflare.
Quick Access
ToggleWhat is Domain Pointing?
Domain pointing is the process of directing your domain name to a specific IP address or server where your website’s files are hosted.
Domain pointing is a lifesaver for those who purchase a domain name and web hosting from different web hosting companies. If domain pointing is not available, it would be a disaster, and you would need to transfer the domain name to your website’s server, which is a time-consuming and costly process.
Or, if you bought your web hosting services from a company like Hostinger or Cloudways and see a domain registration offer on Namecheap, you can just point your domain to that server instead of transferring it.
How to Point Domain to Cloudways
If you want to point a domain name to Cloudways then first you need to copy the Public IP from your Cloudways dashboard. In the next step, you need to add a record to your domain provider manage domain section.
After adding a record, you need to come to Cloudways and add your domain name.
How to Get Public IP from Cloudways

To point a domain name with your Cloudways server, first, you need to log in to your Cloudways dashboard.
Then you need to click on the Applications from the header.
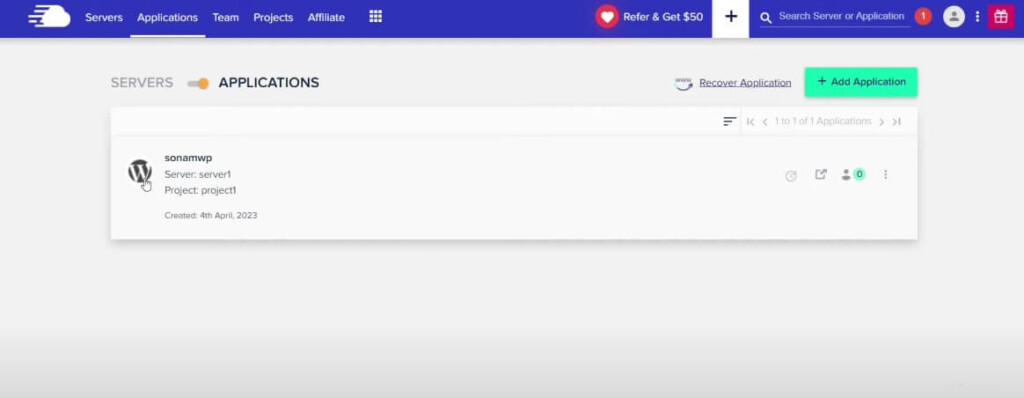
After comes the application tab, you need to select the application where you want to point a domain name from another web hosting provider. If you don’t have already an application, then you need to create one by clicking on the “Add Application” button.
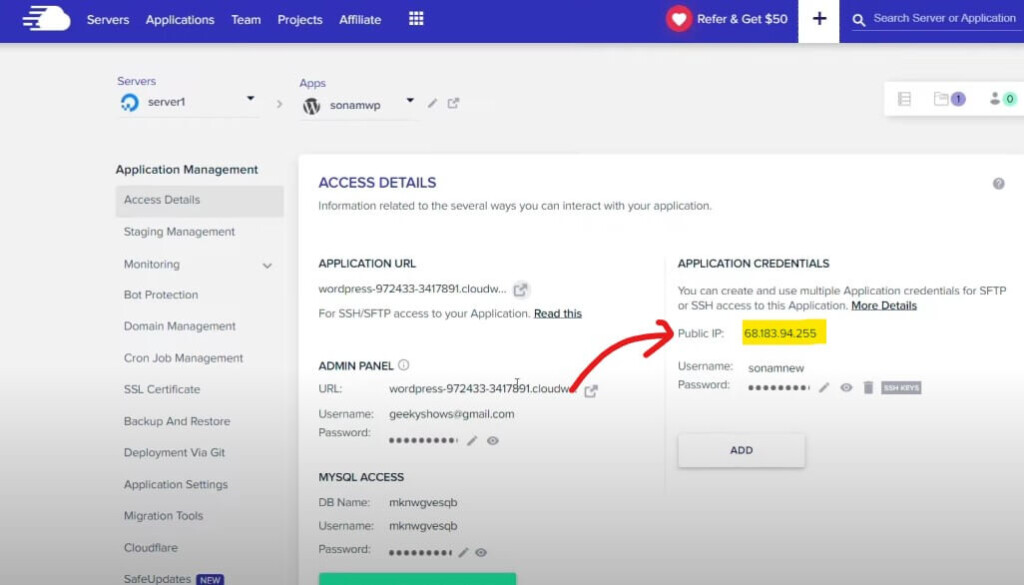
That’s how you can easily copy a Public IP from your Cloudways dashboard.
How to Add Record to Your Domain Providers
In this step, I’ll show you how to add your text record to your domain provider. But before adding TXT records, you need to know a few things.

A DNS record has four sections, Type, Name/Host, Value/Point to, and TTL. Let’s explain this as short as possible.
Type
The Type section indicates what kinds of records you want to add. In this case, we want to add an A record, which points a domain name to an IP address.
Name/Host
The Name or Host section means the domain name that you will be pointing to your Cloudways server. In most cases, this would be the “www” or “@” symbol for the root domain.
Value/Point to
The Value or Point To section is where you need to enter the Public IP address of your Cloudways server. This is the key information that will help you to link your domain name to your server.
TTL
The TTL section stands for Time To Live and refers to how long this record will be cached by DNS servers before being refreshed. The lower the value, the quicker the changes will take effect, but it may also cause a higher load on DNS servers. A common and most used TTL value is 3600 seconds or 1 hour.
Now, you need to add two A records for your domain name, one with the “www” symbol and one with the “@” symbol. Both should have the same value, which is your Cloudways server’s Public IP address. Once you’ve added the records, save the changes and proceed to the next step.
Record 1: Type: A, Name/Host: www, Value/Point to: [Your Cloudways server’s Public IP], TTL: 3600
Record 2: Type: A, Name/Host: @, Value/Point to: [Your Cloudways server’s Public IP], TTL: 3600
How to Add Domain Name to Cloudways
After adding the text record on your domain DNS management section, you need to go to the Cloudways dashboard again.
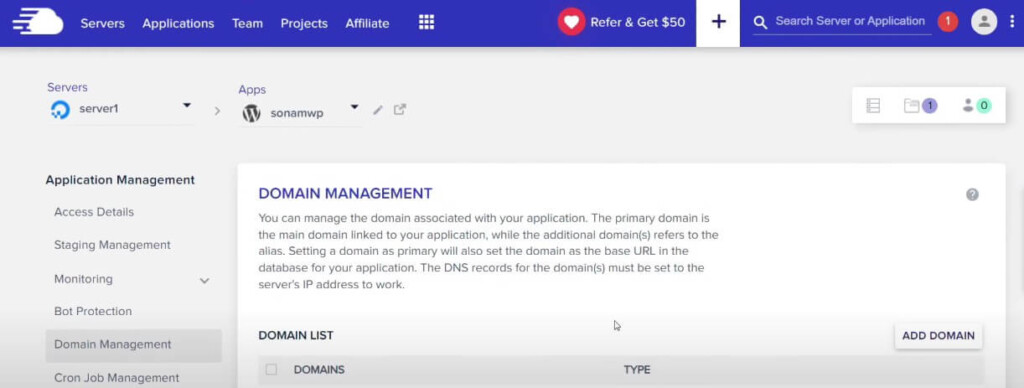
After coming to your Cloudways dashboard, you need to click on the Domain Management tab from the left side.
Then you click on the Add Domain.
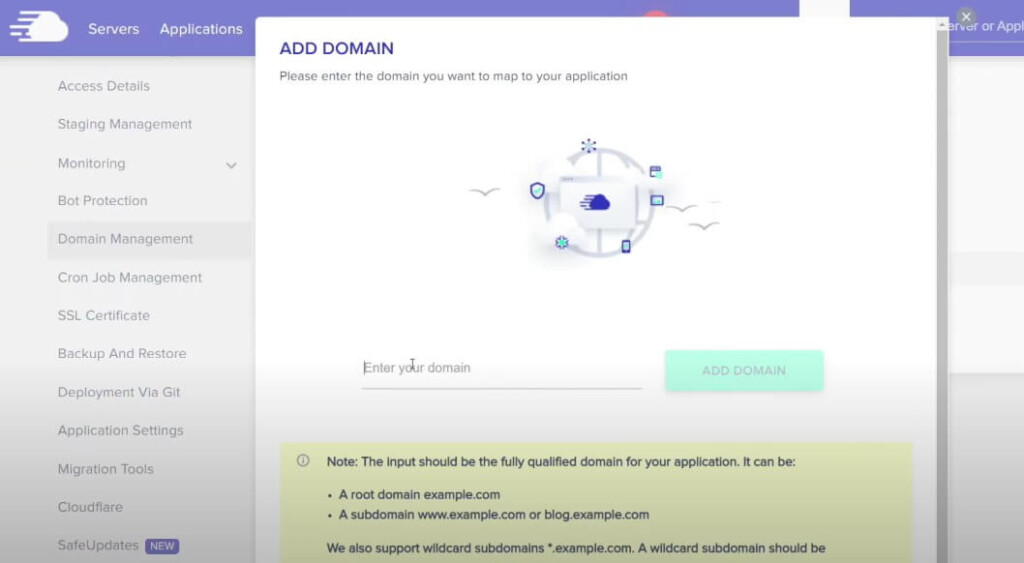
Then a popup will appear on your screen, now you need to type your domain name here and click on the Add Domain button.
Congratulation! You successfully point a domain name to Cloudways.
Let’s take a quick overview, of how you can add text records on different domain name providers. Today, I’ll example with three popular domain name providers such as Hostinger, Namecheap, and Cloudflare.
How to Add TXT Record on Different Hosting Providers
Let’s talk about how to add TXT records on Hostinger, Namecheap and Cloudflare.
Adding TXT Record to Hostinger
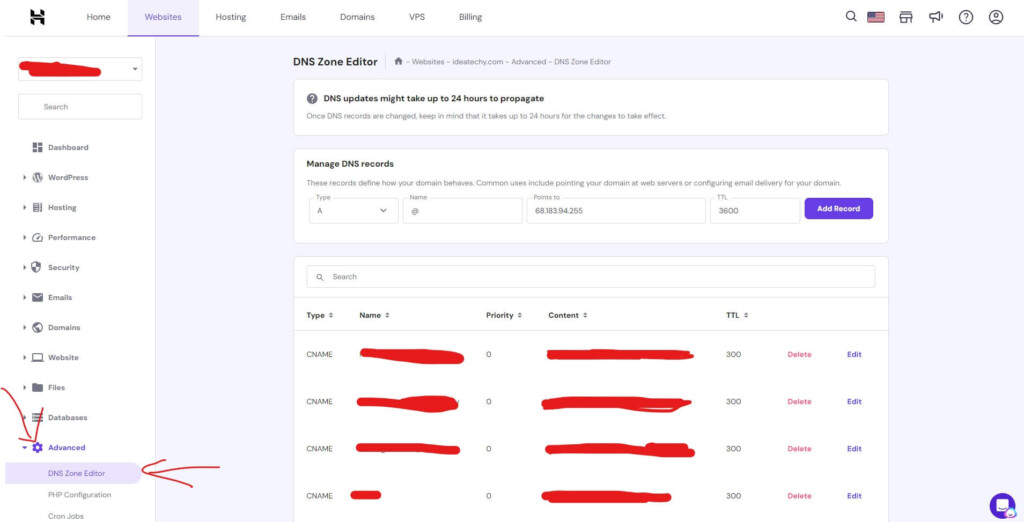
To add a TXT record on Hostinger, first log in to your Hostinger hPanel. After logging in to Hostinger hPanel, you need to go to the website management section.
After coming to this page, click on Advanced and then on the DNS Zone Editor from the dropdown menu.
Now, you can add your desired TXT record by clicking on the Add Record button and selecting TXT from the Type dropdown menu. Don’t forget to save these changes.
Adding TXT Record to Namecheap
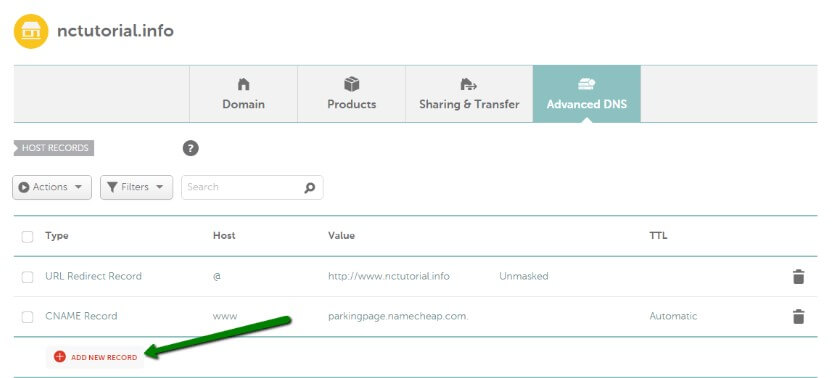
To add a TXT record on Namecheap, you need to log in to your Namecheap account. After login to your account, go to Domain List. Then, you need to choose the domain name from the list that you want to update and click on the Manage > Advanced DNS tab.
After coming to this page, you need to click on the +Add New Record to add a new record. Now select TXT from the drop-down menu of Record Type, and then enter the desired Name and Text values.
Adding TXT Record to Cloudflare
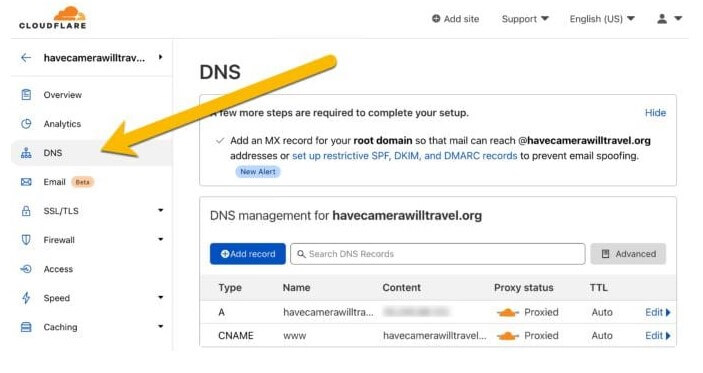
To add a TXT record on Cloudflare, you need to log in to your Cloudflare account and select the domain name you want to update.
Then, click on the DNS tab and click on the +Add Record button to add a new record. Select TXT from the Type dropdown menu and enter the desired Name and Text values.

![9 Best Web Hosting Free Trial In 2026 [No Credit Card] web hosting free trial](https://couponforhost.com/wp-content/uploads/2023/09/web-hosting-free-trial-1024x576.jpg)


