Hostinger is the world’s most popular and well-known for providing the best web hosting at the most affordable price possible.
Most bloggers and website owners start their online journey with Hostinger. Almost 90% of live website owners start their websites with a tiny budget.
When we talk about the best web hosting with this tiny budget, Hostinger is the first choice.
This guide will walk you through the step-by-step process of How To Purchase Web Hosting From Hostinger easily.
By following these simple steps, you can have your website up and running quickly.
Quick Access
ToggleWhy you need to choose Hostinger to purchase web hosting?
Hostinger stands out by offering a free domain with a yearly web hosting plan. This deal significantly reduces initial setup costs, making it an attractive option for new website owners.
Additionally, every web hosting plan comes with a free SSL certificate. This essential feature not only secures your website but also boosts its Google rankings.
For professionals seeking a polished online presence, Hostinger includes a free business email. This feature allows for a more professional interaction with your audience and clients. Furthermore, the daily backup service ensures your website’s data remains safe.
Their 99.9% uptime guarantee helps you ensure that your website is always available for your visitors. If your site has a lot of traffic and goes down for a certain time, you will lose a lot of traffic, which will negatively impact search engines.
Hostinger further boosts website performance with a free CDN. This service improves website speed and accessibility, providing a smoother user experience worldwide. With these features, Hostinger positions itself as a robust, budget-friendly option for web hosting services.
How To Purchase Web Hosting From Hostinger
Let’s start our process of purchasing web hosting and domain from Hostinger.
Step 1: Go to Hostinger
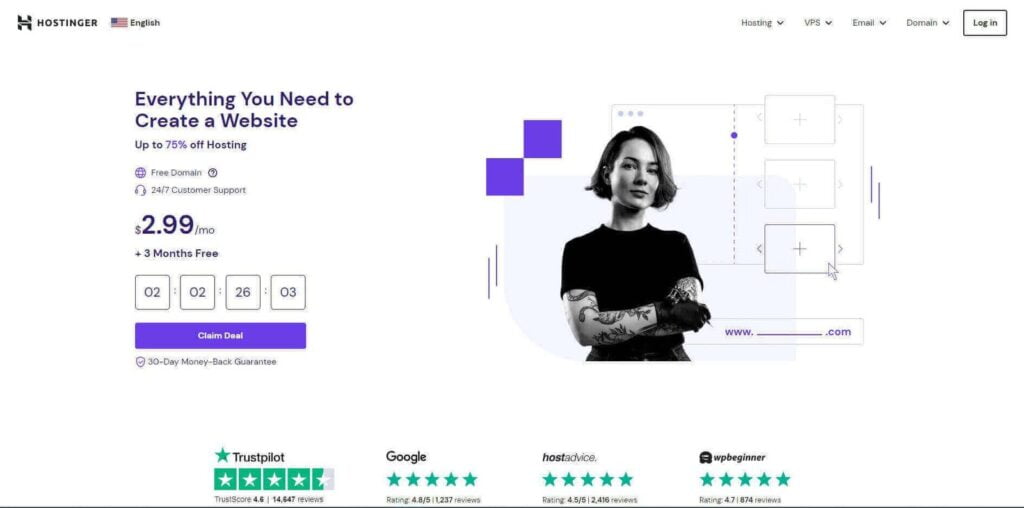
First, you need to visit Hostinger.com to purchase a web hosting and domain name from Hostinger. Then, you need to select your web hosting package.
Hostinger offers all kinds of web hosting services for all website requirements, such as WordPress, Shared, VPS, Cloud, Dedicated, and more. However, if you want to start your website with WordPress, then WordPress hosting is an ideal choice.
Once you have chosen your hosting package, proceed to the next step.
Step 2: Choose Your Hosting Plan
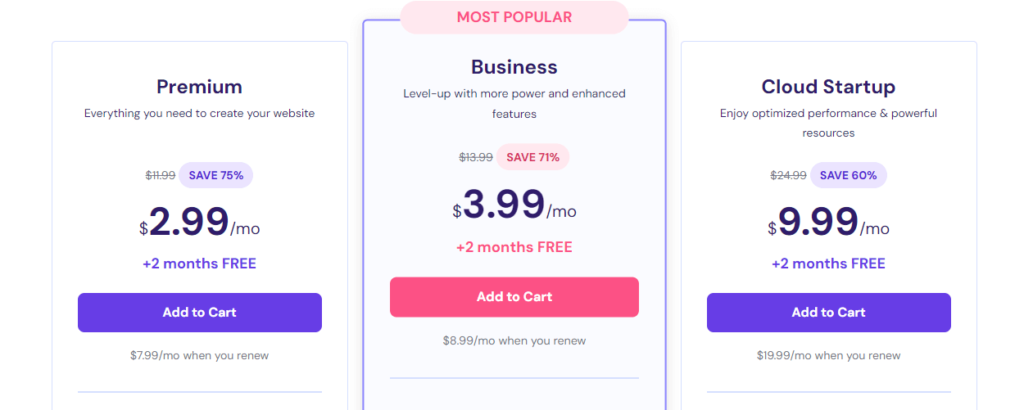
In this step, you need to select your web hosting plan. However, we highly recommend you go with a Business plan. With the Hostinger business plan, you’ll get 5X speed improvement, Daily Backup, CDN, and many more features.
Step 3: Choose Billing Period
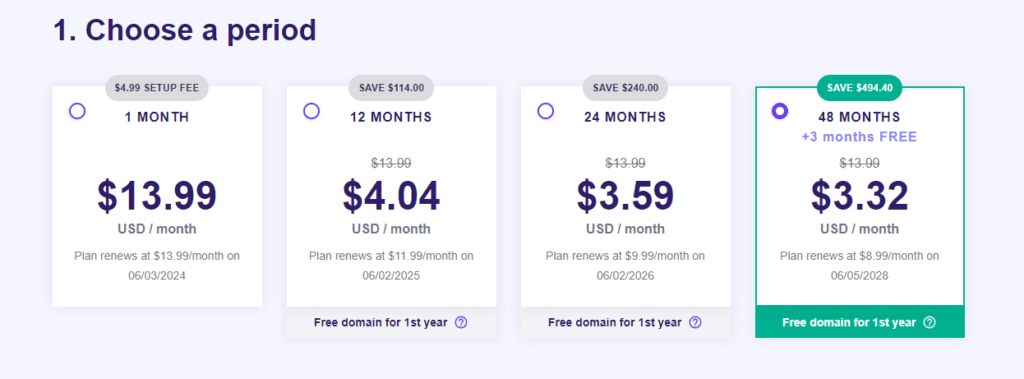
In the next step, you need to choose your billing period. Hostinger offers 4 types of billing periods, 1 month, 12 months, 24 months, and 48 months.
If you go for a long period, you can save more money. Hostinger’s 1-month plan costs $13.99/month, their 12-month plan costs $4.04/month, their 24-month plan costs $3.59/month, and their most saving 48-month plan costs $3.32/month.
But if you are a beginner and want to try Hostinger first, then go with 12 12-month billing period.
Step 4: Create an Account

In this step, you need to create an account on Hostinger. Hostinger allows you to create an account using Email and password or sign up with Google and Facebook. After creating your account, jump to our next step.
Step 5: Review Your Order and Make Payment
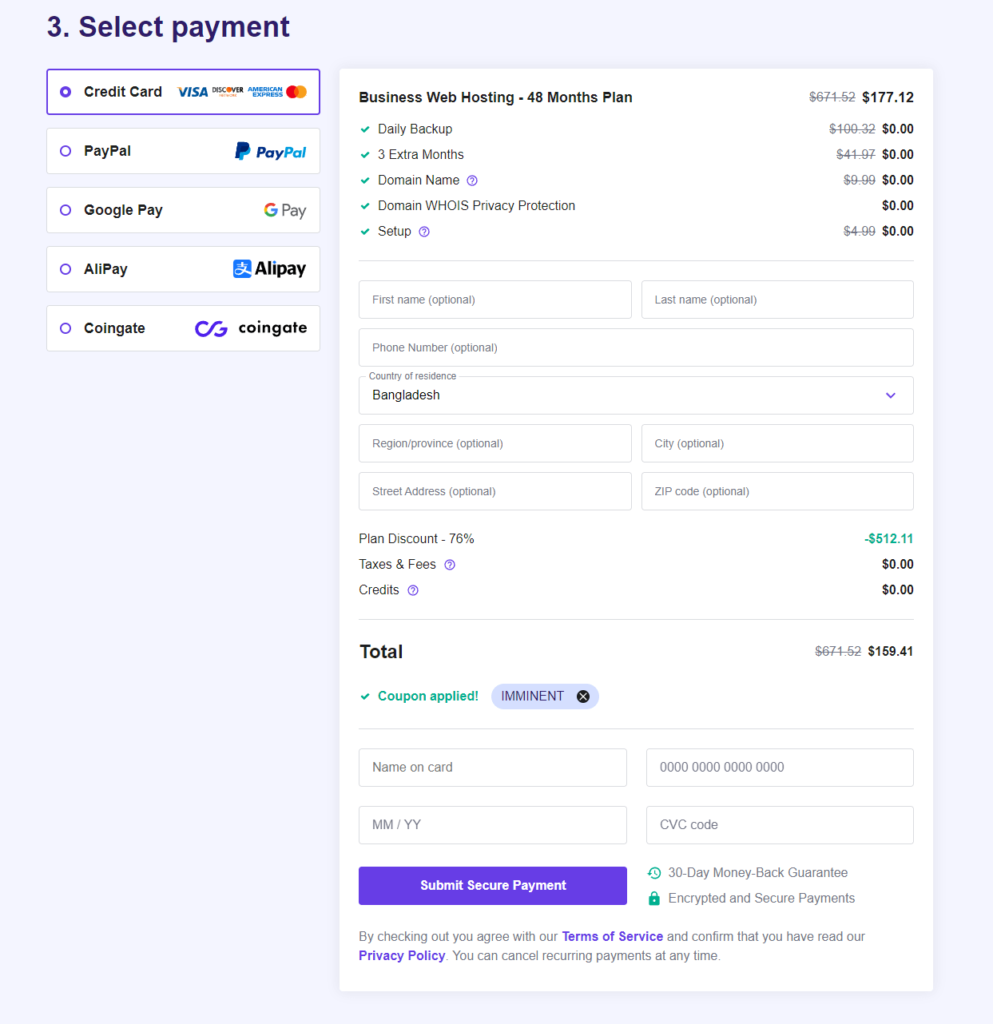
In this step, you need to complete your billing. But first, you need to fill in your personal information. Don’t forget to collect the Hostinger coupon code to get an additional discount on Hostinger checkout.
Enter your First Name, Last Name, Street Address, City, Postal Code, Country, and Phone Number. After that, choose your payment option, which will be a card, PayPal, Google Pay, AliPay, or Coingate.
Lastly, click on the Submit secure payment button to finalize your purchase. Congratulations—you have successfully purchased a domain and web hosting from Hostinger! Now it’s time to build your website and share your ideas with the world.
Hostinger coupon code
Up To 75% OFF + 3 Months Free + Free Domain
- Last tried 1 Hour and 35 Mins ago
Step 6: Claim Your Free Domain From Hostinger

After purchasing your web hosting from hostinger, you’ll see this kind of option to claim a free domain from Hostinger.
So, you need to click on the Claim Domain button.
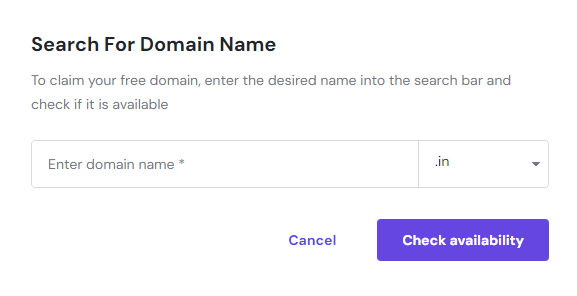
Then you need to search for the domain name to check the availability of your domain name.
If your desired domain name is available, then click on the add to cart button and proceed to the checkout process. Your free domain will be automatically added to your order.
Congratulations, you now have a unique domain and reliable web hosting from Hostinger.
Conclusion
By following this easy step-by-step guide, you have successfully purchased domain and web hosting from Hostinger.
With its affordable prices and essential features, Hostinger is an ideal choice for those just starting their online journey. You can trust Hostinger to provide a smooth and reliable experience for your website.
Still, if you have any questions about this topic, feel free to let us know in the comments section or our live chat. Our team of experts will be happy to assist you!


![9 Best Web Hosting Free Trial In 2025 [No Credit Card] web hosting free trial](https://couponforhost.com/wp-content/uploads/2023/09/web-hosting-free-trial-1024x576.jpg)


